Monday, November 29, 2010

Art 247 Final: My Photos

I started off the semester shooting only in JPG which I soon found out was a disadvantage when editing in Photoshop. I started to shoot in RAW format making all of my pictures much easier to edit. All of my pictures were shot in RAW unless specified. Also, when I was first shooting my camera was set on a setting that made the camera think that I was shooting in shade making all of my shots look washed out with a burnt weird color. After finding this out and fixing it my picture taking has gotten better and my editing time had been cut in half, on average.
Camera: Nikon D60
Lenses: 1) 18-55 mm
            2) 55-200mm

Beartooth Pass
Lens: 18-55mm
Focal length: 20mm
ISO: 400
Aperture priority
shot in JPG
I used these settings to capture the light reflecting off of the water but since I did not have a graduated filter on me the sky turned out kind of bright. So in Photoshop, I added a levels adjustment layer to bring out the blue in the sky a little more. By painting the foreground white with a soft light I brightened the hills and water so that they are not so dark.


Yellowstone Park
Lens: 18-55mm
Focal length: 18mm
ISO: 400
Aperture priority
shot in JPG
Since there was fog present that morning I was shooting in aperture priority hoping that the fog would make a cool soft look to the the photo. I felt that I accomplished just that, so I did not edit it and left it the way it was.

The Yellowstone River
Lens: 18-55mm
Focal length: 55mm
ISO: 200
Shutter priority
I was shooting in shutter priority to try and capture an abstract blur of foam on a pool off of the Yellowstone River. The picture turned out very washed out and the water was not swirled at all. In Photoshop I turned down the exposure to darken everything in order to make the picture the right color. Then I turned the recovery up to further darken the water. Then by adding a little clarity the reflection of the rock cliff behind the water started to show up more clearly.

On the Yellowstone River
Lens: 18-55mm
Focal length: 18mm
ISO: 140
Automatic
I was out trying to learn how to use my camera by comparing the different settings with the auto setting and I ended up trying this really dark picture. When I opened this picture in Photoshop I really liked the composition but did not like how dark it was and failed at fixing it, so I decided to play with it instead and make an abstract photo. I turned the exposure down a little to get the sky right, then I turned the recovery all the way up and it looked alright. Next I turned the fill light up so that the little black dog buddy's features showed up better. Then I turned down the contrast all of the way and the photo looked kind of 3D so I kept it there.

West Billings
Lens: 18-55mm
Focal length: 34mm
ISO: 200
Shutter priority
I was out taking photos with my friend while he was hunting and captured this beautiful sunset. I shot this in shutter priority in order to have a slower shutter speed so that the colors would come out better in the sky. It turned out well but the colors were faded a little because I do not have a graduated filter. In Photoshop I darken everything by lowering the exposure and adding a little recovery. I think it turned out pretty well.

Yellowstone National Park
Lens: 55-200mm
Focal length: 110mm
ISO: 400
Aperture priority
shot in JPG
I used aperture priority to try and capture the color from the sunrise on these mountains but failed miserably because of the bright hazy light conditions. This one was a pain in Photoshop because I had to considerably darken the background while keeping the foreground the same. I added a layers adjustment layer and made the background darker. Then I painted the foreground white with soft light while slowly reducing my opacity as i move up the picture so that the light and color is correct throughout.

Tree at RMC
Lens: 18-55mm
Focal length: 55mm
ISO: 400
Aperture priority
This was taken on a nice sunny day on the RMC campus. I used aperture priority in order to capture a shallow depth of field so that the sap droplet was only in focus. In Photoshop I increased recovery a little to bring out the colors. Then I added fill light so that the cracks in the bark would show up a little better. Finally I boosted the contrast  and cropped it to organize the vertical composition of the picture elements.

Beartooth Pass
Lens: 55-200mm
Focal length: 90mm
ISO: 125
Automatic
shot in JPG
I took this photo in auto because I was getting sick of failing at every other setting since I was still learning. This was a photo that I really liked composition wise but i didn't like it because it was a little out of focus and a little washed out. First I cloned out the road sign that was at the bottom of the picture and then added a levels adjustment layer to darken the sky. Then in order to keep the foreground the same I painted over it with a white soft light at 30% opacity.

Red Lodge area
Lens: 18-55mm
Focal length: 44mm
ISO: 100
Automatic
shot in JPG
This was taken in automatic because I was trying to take action shots with Rob's dog Rudy but ended up taking a posed shot anyway. In Photoshop I used a levels layer to darken Rudy a little and then used the clone stamp to get rid of some slobber on his ear that was distracting.


Yellowstone River
Lens: 18-55mm
Focal length: 45mm
ISO: 200
Automatic
This is a photo of some cool rusty spring I stumbled upon on the Yellowstone river. This was once again taken in automatic because I was sick of trying to use some other exposure program.  All I did in Photoshop was add a hint of recovery, contrast, and clarity which made the colors pop so I kept it that way.

A Flower at RMC
Lens: 18-55mm
Focal length: 55mm
ISO: 400
Aperture priority
This photo was taken outside of the computer lab at RMC during a free work day in photo class. I took this shot in aperture priority with a shallow depth of field so that the flower was in focus but the background was blurry. In Photoshop i added a hint of recovery, contrast, and clarity making the color pop and then I cloned out a few distracting white spots on a few of the petals.

West Billings
Lens: 55-200mm
Focal length: 120mm
ISO: 200
Shutter priority
This was shot while my friend rob was hunting on a cold and windy day in shutter priority in order to capture the motion of the cattails. This turned out so well that all I had to do was crop it so that the background was less distracting.

West Billings
Lens: 18-55mm
Focal length: 18mm
ISO: 200
Automatic
This was taken in automatic because I wanted to see how well it would turn out in the the low light. I started by cropping some of the foreground and some of the left side to get rid of distracting parts on the frame. In Photoshop I reduced exposure and boosted recovery to darken and bring out the colors of the sky. Next I raised the fill light to brighten the foreground and finally used the clone stamp to get rid of sensor spots.

Beartooth Pass
Lens: 18-55mm
Focal length: 22mm
ISO: 100
Automatic
This was taken in outside of Red lodge up heading up the main fork in soft morning light and heavy wind. Once again taken in automatic just as an experiment, which ended up turning out well. In Photoshop I turned recovery up about half because it seemed to bring out the colors of the sky well. Next I added fill light to lighten the trees and a little contrast and clarity to make it look better.

Main Fork, Red Lodge
Lens: 18-55mm
Focal length: 18mm
ISO: 400
Aperture priority
This photo was taken on looking up the main fork in Red Lodge. My idea was to get a good landscape shot with lots of layers and perspective making it all the more impressive. The lighting was so soft and overcast that it was hard to get everything in focus so I tried to use aperture priority which helped. In Photoshop I lowered the exposure to darken the sky to make the bleak color more appealing, but then had to add a little fill light for the foreground. Finlay I boosted recovery, contrast and clarity a little making the picture come together.

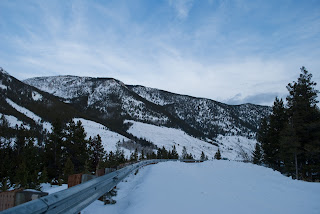
Beartooth Pass road
Lens: 18-55mm
Focal length: 18mm
ISO: 400
Aperture priority
The focus of this photo was all composition of the wind carved snow, the sky, and the low angle. I shot in aperture priority trying to make everything in focus with a wide depth of field. In Photoshop I first moved recovery to max in order to darken the sky and the snow a little. Then added a little fill light for the dark trees and a little contrast because most pictures can use it. Finally I used the clone stamp to get rid of the sensor spot in the middle of the sky.

Beartooth Pass
Lens: 18-55mm
Focal length: 18mm
ISO: 100
Automatic
This photo was taken in automatic because the light was okay for it for once. I was trying to focus on a neat scenery including the really blue sky and crazy looking tree and I think I captured it pretty well. In Photoshop recovery was maxed out again to boost the color of the sky, then a pinch of fill light was added to brighten the tree so that all of its interesting features could be seen.

Main Fork
Lens: 18-55mm
Focal length: 18mm
ISO: 200
Aperture priority
This was shot in aperture priority in order to have a shallow depth of field with everything in focus. I had a hard time trying to get everything in focus especially in the foreground. By adding a pinch of contrast and boosting the recovery for the bleak sky color I made the picture turn out fairly well.

Mossy Branch
Lens: 18-55mm
Focal length: 55mm
ISO: 200
Aperture Priority
This picture was difficult to capture because all of the background kept turning out to be very distracting. I captured this and decided I like it the way it is. I used aperture priority to capture the moss in focus but nothing else. All I did in Photoshop was add a little blacks to make the branch a little darker and a tiny contrast boost as well.

Dark Green
Lens: 18-55mm
Focal length: 33mm
ISO: 200
Aperture priority
I also had a hard time trying to capture this darker green moss while having a good non distracting background. I took this in aperture priority in order to get the same blurred background effect. In Photoshop I added a little fill light to brighten the branch and used a little recovery to bring the green out in the lichen. Like usual I added slight contrast and also cropped most of the background in order to focus more attention on the portrait subject.

Rock Creak
Lens: 18-55mm
Focal length: 28mm
ISO: 100
Automatic
This was shot in auto because I felt like trying it. This picture turned out very well for how much I played with it in Photoshop. First I turned recovery up all of the way to make the sky and the water darker and more vibrant. Next I gave it a contrast and a clarity boost just for kicks and giggles. Lastly, I moved blacks up 50% making the photo look really cool.

Side Mirror
Lens: 18-55mm
Focal length: 30mm
ISO: 125
Automatic
This shot was shot in automatic because it was a quick spur of the moment shot while I was driving to Powell, WY.  All I added in Photoshop was a little recovery and a little contrast. There is always room for a few artsy shots.

Ribbon River
Lens: 18-55mm
Focal length: 24mm
ISO: 110
Shutter priority
This was a very exciting shot for me because it was something I have wanted to try since the beginning of this class. I finally captured the ribbon effect of water by using  a slow shutter speed in shutter priority. I used a tripod and a .8 second exposure time making for the soft look of the water. I added about 75% recovery making the snow color detail and the color of the water pop. I also added a little blacks to add darkness to the water and a little contrast because it make it always look a little better.

Up the Main Fork
Lens: 18-55mm
Focal length: 18mm
ISO: 200
Aperture priority
I took this photo in aperture priority in order to get as much in focus as I could. This photo turned out too bright in the harsh light so I had to turn down the exposure as well as turn up the recovery do darken and bring out the color of the ice. The clarity and contrast were boosted a little as well.

Around the Bend
Lens: 18-55mm
Focal length: 18mm
ISO: 200
Aperture priority
I used aperture priority to once again capture a wide depth of field so that everything is in focus. The harsh light made it difficult to get the background in focus. A graduated filter would have been nice here so that the sky and mountain were not so bright. I had to darken the sky using a little recovery while brightening the trees in the midground with some fill light. Contrast and clarity were also added like usual.

Mountain
Lens: 18-55mm
Focal length: 18mm
ISO: 360
Aperture priority
This was a photo where I wanted a good composition, using aperture priority to obtain everything in focus. The plant in the foreground was less in focus than I wanted which means I needed to be further back when I took the picture or a large depth of field. In Photoshop I added a little recovery for the sky and and some clarity and contrast as usual.

Ice droplets
Lens: 18-55mm
Focal length: 55mm
ISO: 200
Shutter priority
This photo was taken of ice stalactites hanging from an ice sheet over a river in Red Lodge. I thought I would go for the ribbon like texture with the water while capturing this ice in focus. The water turned out well but the droplets were not as in focus as I wanted them to be. I used a tripod and a 5 second timer to reduce camera shake. In Photoshop I added a pinch of recovery, blacks, and contrast.

Light green
Lens: 18-55mm
Focal length: 55mm
ISO: 200
Automatic
This was shot in automatic because I could not get a good picture right away with aperture priority, which is what I was trying and should have used. The moss is not in focus all of the way but I liked the composition of the portrait. The branch also brings out the diagonal lines are better than vertical ones rule. In Photoshop I boosted the recovery because it seems to always help, and a little blacks and contrast to bring out the colors and definition of the branch.

Stumped
Lens: 18-55mm
Focal length: 18mm
ISO: 100
Automatic
This was once again foolishly shot in auto because I was too frustrated with the cold to take my time with any other setting. I was going for a portrait style picture with the log as the center of attention while getting a foreground and everything else in focus. In Photoshop I added recovery to darken the sky, fill light to brighten the foreground and contrast and clarity because it looks better with just a little bit more.


Abstract
Lens: 18-55mm
Focal length: 18mm
ISO: 200
Aperture priority
This was a photo I wanted to make look really weird, which I think I accomplished very well. I was not incredibly impressed with the photo and nothing I did to it made it look better so I decided to make an abstract using the effect toolbar in Photoshop. I tried various effects but the one that I liked the most was called "difference clouds" which is the one I used.


Saturday, November 20, 2010

National Audubon Society Guide to Nature Photography: Part Six

"National Audubon Society Guide To Digital Nature Photography"
Part Six: Digital Processing

     The final section of the "National Audubon Society Guide To Digital Nature Photography"by Tim Fitzharris is titled "Digital Processing" and reviews how to store images, process them, as well as gives you an idea of what you need to know about preparing images for display of some sort. As a novice photographer, I've  learned that this section,  above all, is one of the most important. Hopefully, through continued practice and knowledge, I will become a better photographer and spend less time manipulating images. However, this part of the process is one of the most important because it helps you create a proper presentation of your images.
     In the first chapter of this section, Fitzharris points out the importance of having enough memory and space to hold your images. Being in the field and taking so many shots with only having a few that turn out, it is important to have enough space so that you don't worry about taking too many shots, or not taking what could be a quality shot because you don't have the space for it. I realized this early on and bought a 4 gigabyte memory card, so that I had an adequate amount of space. Options for storing these images include putting them on your laptop, hard-drive, or other portable storage devices. Personally, I like to store images not only on my laptop but also on an external hard-drive so that if something happens to my computer, I have a backup.
     One reason I make sure that I have enough memory and space and that I frequently convert my images to another storage device is because I like to shoot in RAW format. You have the ability to do so much more with RAW photos because the data is saved in its original state. I found RAW extremely important when my camera was set to a weird setting that made all my photos looked washed out. By shooting in RAW, I was able to fix this. Also in RAW, you are able to change so many more things that you might have done wrong, such as changing exposure and light settings.
     In creating quality photos, the use of Photoshop or other image processing software comes in handy. This is the reason why shooting in RAW is really helpful; when you are in Photoshop (or another program), you have the ability to manipulate your photos by changing brightness, saturation, and color balance, cropping or straightening your image, layering multiple images, and many other useful things. For example, you have the ability to select specific sections of your photo and adjust color, saturation, brightness, etc. on that single selection. Photoshop is also a fun way to create more artistic and creative images because it provides you with endless opportunities.
     Through reading the "National Audubon Society Guide to Nature Photography, I have learned numerous things that will help me in becoming a better photographer. From what types of clothes to wear, to what type of equipment to use, to actually shooting the subject matter, and finally to processing and presenting the final image. After reading this book, I can see nature from a different perspective--I have the ability to see the potential of a subject and can think of how I can capture a quality shot and maybe what I can do with it in Photoshop to manipulate it. From start to finish, Fitzharris does a great job helping a novice photographer learn how to photograph nature subjects.

National Audubon Society Guide to Nature Photography: Part Five


"National Audubon Society Guide To Digital Nature Photography"
Part Four: Light on the Land

     Part Five of the "National Audubon Society Guide to Digital Nature Photography" by Tim Fitzharris is titled "The Close-Up World," and gives some good tips on working at close range; pointing out the various accessories and lenses that can be used. This section also discusses some different ways of taking shots of wild flora, whether it be close-up or with a telephoto lens. I enjoyed reading this section because of my recent interest in taking macro shots, as well as learning how to see the world from a different perspective.
     The first part chapter one in this section discusses the different types of lenses that can be used for taking close-up shots. Fitzharris points out that choosing the right lens or lens combination for your shot really depends on the subject that you are shooting. Having a true macro lens would be a very beneficial thing for me to have since they would allow me to get quality close up shots of various subjects. Another lens that Fitzharris discusses using for close up shots is a telephoto lens, which can be helpful in situations where you must remain at a distance from your subject matter. 
     The second half of the first chapter discusses improving image quality and light conditions when shooting up close. The first interesting thing that Fitzharris talks about is the idea of reversing the lens using an adapter piece to improve image quality. I found this to be an interesting method and not something I had ever really thought about doing. He also goes over the importance of using flash, especially since the camera itself can block the light when taking close up shots. I think that having multiple electronic flashes instead of just the one on my camera body would be extremely helpful when taking some shots, especially since it will allow me to choose where I want the light source coming from. Another helpful accessory that I would like to invest in would be a light diffuser (although I guess I could just use a Kleenex as Fitzharris suggests). I rarely use flash when taking shots, but it would be helpful to have a way to soften the light if I do need additional lighting. 
     The second chapter in the section is titled "Wild Flora" and in it Fitzharris discusses some considerations when shooting flora, some traditional techniques to shooting flowers, as well as some more "offbeat" techniques. Some things to consider when shooting flowers is dealing with wind because unless you are trying to create movement, you will run into some problems. Fitzharris suggests using a "Plamp" to help stabilize the flower on windy days or making sure you time your shots in between wind gusts. He also points out a few tips on lighting conditions that I found helpful, such as using an umbrella to block the sun and a reflector to bounce light off of when shooting in direct sunlight. 
     Later in the chapter, Fitzharris gives a few tips on how to take conventional portrait shots of flowers but then suggests experiments with other angles and creative ways of shooting flowers. For example, he explains the "slow smoothie" which takes what most people dislike when shooting flowers--wind--and turning it into something creative. I thought that this was an interesting way of shooting flowers, because while shooting an animal in motion seems normal, a flower in motion seems a little different. I also was found the "down and dirty" approach quite interesting, as well. I know that next time I am taking a flower shot, I won't go for the conventional portrait shot with sharp focus, but maybe try something new and creative instead. 

Tuesday, November 16, 2010

National Audubon Society Guide to Nature Photography: Part Four

"National Audubon Society Guide To Digital Nature Photography"
Part Four: Light on the Land

     Part Four of the "National Audubon Society Guide to Digital Nature Photography" by Tim Fitzharris discusses ways in finding photographic potential in landscapes, using good perspective in making these landscapes quality shots, and tips on how to take breathtaking reflections of landscapes through the use of water. It is helpful to recall this section while in the field taking landscape shots so that your able to use the landscapes full potential in making a beautiful scene.
     When taking landscape photos, Fitzharris describes some things to look for that can help in finding photographic potential in landscapes. The first thing to look for is color. Remembering back a few chapters that red is more attractive than yellow, you should look for the color red, or hues of it, in your landscapes. By focusing your attention on some sort of color scheme, or the color red, you can make shot have a feel to it making it more appealing. The colors must work together in harmony in order for the picture to be a complete success. Clouds are another extremely important aspect of landscape photography that can add so much to a photo. Sunrises and sunsets are never as exciting without clouds. Clouds can be used as a subject, to fill the bleak blue sky, and to add color and definition towards the landscape. Interesting weather such as fog or falling snow can also add to the beauty of the landscape. The last incredibly obvious but important thing to look for is wildlife. Unfortunately you can not use wildlife as an indication of a good landscape but they can add to the composition of a landscape very well. Also, you have to be cautious that there are no human artifacts, such as a telephone poles, that are in the way, making your landscape look terrible.
     One incredibly important aspect of landscape photography is the power of perspective. (The idea of perspective is difficult to explain so if you do not understand what I mean, well sorry.) In order to create good perspective you need to think of how to use the landscapes features in making three dimensions. By using size cues one can see how big something really is or how far away something really is. Having something that is both in the foreground and the midground makes it easier to tell how far away things are in relation to the size of the object in the foreground. Obtaining good perspective is one of the most important yet difficult tasks that takes careful thought and practice, so do not be discouraged if you don't pick it up right away.
     By using lights' natural ability to reflect off of certain surfaces, such as water, you can make some really cool reflection shots. Fitzharris describes, once again, that sunrise and sunset are the best times to obtain the right angle of light refraction as well as adding color to the shot. Also, it is helpful to have a tripod in case you need to change angles to get the reflection shot you want. Fitzharris also discusses the proper attire you may want to wear when taking reflection, such as neoprene chestwaders, in case you need to actually get in the water to capture a specific shot or angle. One other thing to keep in mind is the time of day; Fitzharris points outs to avoid getting too much wind on the water, shooting at dusk and dawn are the best times, because this is when it is most likely to be still.
     This chapter is an important one to know, but you also must know the previous chapters and what is discussed previously to really capture the perspective you want. Knowing how to spot photogenic landscapes, how to create good perspective, and also the powerful use of bodies of water to create reflections are all important things to keep in mind when taking quality shots. This chapter helped me think of new ways to look at nature through the camera, as well as new ways to take shots.

Thursday, November 11, 2010

National Audubon Society Guide to Nature Photography: Part Three

"National Audubon Society Guide To Digital Nature Photography"
Part Three: Adventures with Wildlife
     Part Three of the "National Audubon Society Guide to Digital Nature Photography" by Tim Fitzharris discusses 'adventures in the wild'; examining such ideas as getting closer to wildlife, capturing wildlife in action, and composing portrait shots of wildlife.
     The first chapter in part three involves being able to get close to the subjects while keeping both ourselves and the animals safe. Fitzharris explains that it is easier to take shot of animals that are less spooked by our presence, whether it is because they are used to human interaction (for example, at wildlife reserves or parks) or because they don't find humans as threatening (for example, if they rarely have any human interaction). In order to take good shots of our subjects, we must also make sure that we do our homework on the subject. It would be helpful to know where the subject is found, so we are able to locate them easily and hopefully predict where they're going to be, what they're going to be doing, etc.
     In this chapter, Fitzharris also discusses specific strategies to use when shooting wildlife. You may want to photograph subjects that will be weary of you, so the use of a teleconverter lens will become helpful in this situation. To get close, you may have to use some of the stalking strategies he discusses--keeping low to the ground and moving slowly and quietly when the subject is not looking at you. However, if you are going to get close to them, make sure you don't intimidate them or back them into a corner where they feel trapped. You should allow them to have an escape route so that they can leave if they're feeling uncomfortable. By staying calm and low, you seem less dangerous and confrontational, so they mostly likely won't feel as threatened by you. He also discusses blinds in this chapter, which can be useful in hiding your presence and take shots of unsuspecting wildlife. Fitzharris gives examples of some different types of blinds you can use or make, such as vehicles, trees, tents, and wearing camouflage.
     The second chapter talks about how to capture wildlife in action, using what we've learned in the previous chapter about getting close to the subject. In addition to researching about the subject and their habitat, its also beneficial to know the seasonal activity of the subject. Fitzharris gives good examples of what time of the year it would be better to see different kinds of wildlife action. There are a variety of these kinds of actions, from yawning, to howling, to fighting, to courtship displays, which can make each photograph more appealing. Along with this information and knowledge, it is also important to have a schedule, be on time, and be prepared, so that you have what you need for each different scenario. 
     Other helpful tips from this chapter include having a steady camera, with a tripod that is sturdy and low to the ground. Make sure they you are comfortable when you set up, since sometimes you have to be patient and wait in order to get the shot you are looking for. When shooting subjects, don't worry about taking a lot of shots; the more you take the more likely you will be to capture a good one. This relates to being prepared and making sure that you have enough memory by bringing an extra memory card. This chapter also discusses how to make a stage or setting for your shot. Once you hove your subject you must get in the right position and angle, with the right lens and zoom, to get a good setting or background. By picking your angle and position you make sure that the subject is completely in the frame with good lighting and good focus. Remember to be patient (but ready)and try and observe the subject for a pattern in their behavior so you can guess what they will do next.
     The last chapter in this section describes useful tips in taking portraits of wildlife. Most often then not, telephoto lenses prove extremely important in taking wildlife portraits. With the extra distance you can take close up shots of wildlife without getting to close. It is also important to build your scene usually with a foreground, midground, and background.  The best portraits are the ones that are well thought out having a good subject that is most impressive. The expressions on the subject must be clear and in focus in order to capture feeling and emotion in each shot. Being able to relate to the emotion of the animal can make the shot more appealing.
    

Monday, November 8, 2010

National Audubon Society Guide to Nature Photography: Part Two

"National Audubon Society Guide To Digital Nature Photography"
Part Two: Essential Skills


     Part two of the "National Audubon Society Guide to Digital Nature Photography" by TIm Fitzharris discussed the essential skills needed in order to take quality shots. With these skills, I am able to look at something I want to take a picture of and have to ability to create a shot that is visually appealing to an audience. The main essential skills that are discussed in this chapter are exposure, being able to read the light, depth of field, effects of motion, modifying natural light, and picture composition. 
     One of the most important skills to have is knowing how to correctly expose your shots so that they are not over- or under-exposed. Using the histogram feature on your digital SLR can prove beneficial in getting an idea of what exposure you will need for each shot. By checking the extremes of bright and dark on the histogram, you are able to see whether the shot has too much or too little light and adjust your exposure accordingly. To do this, there are different exposure modes you can set your camera to: aperture priority, shutter priority, and manual mode. Aperture priority allows you to control the amount of light that enters the camera (by changing the f-stop).  Shutter priority allows you to control the amount of time that the shutter is open, while the aperture is chosen by the camera. The shutter speed also controls the effects of motion, by allowing you to either freeze the motion or blur it. This is done by either increasing or decreasing the amount of time the shutter is open. In manual mode, you are able to control both shutter speed and aperture. To further "tinker" with the exposure, you can use exposure compensation, to help compensate for scenes that are too bright or dark. 
     Another skill that is helpful is being able to identify what type of light setting you're in. When taking shots, you must have an idea of what type of shot you are looking to take and what type of light is required for this. For example, you can photograph something with a front light, back light or side light, depending on what you are trying to capture in your shot. Both the time of day as well as the weather are important things to consider when taking shots. Obviously, if you are taking sunrise or sunset pictures, plan your times accordingly, but Fitzharris points out that in general, overcast or cloudy days are the ideal lighting conditions. 
     An equally important skill is being to choose the correct depth of field, which again depends on what type of shot you are trying to capture. Depth of field is controlled by the aperture, with a smaller aperture meaning a greater depth of field and vice versus. Depth of field can be helpful if you are trying to capture a specific subject and make it stand out by creating a shallow depth of field that focuses mainly on one item (the subject you are capturing). 
     Being able to modify the natural light of the scene can be helpful in creating a more appealing shot, especially when certain lighting conditions are not ideal. To aid in this process, there are a variety of filters that can be used, depending on what you are wanting to change. The polarizing filter has the ability to reduce glare and makes colors pop. For example, when I was out taking pictures of subjects that are too bright, the polarizing filter was helpful in creating the shot that I wanted by reducing the glare. There are other filters that can be used to modify the lighting situation, such as the neutral density filter, the split neutral density filter, and the graduated neutral density filter. Other useful items to aid in light modification are the reflectors and flashes (either on the camera or off). 
     One of the most important skills necessary when setting up and taking shots is being able to design the picture space, or the composition of your photos. There are seven things to remember when composing the elements of your picture: red is more attractive than yellow, large draws more attention than small, difference draws more attention than conformity, jagged lines are more striking than curved ones, diagonal lines are more attractive than vertical ones, sharpness is more attractive than blur, and light is more attractive than dark. Lastly, he talks about the center of interest and where to place it, pointing out that putting the center of interest in the middle of the frame is rarely a desirable place. By using the rule of thirds, you can place your center of interesting in a more appealing place that will be visually pleasing to your audience. 

Thursday, November 4, 2010

National Audubon Society Guide To Nature Photography: Part one

"National Audubon Society Guide To Digital Nature Photography"
Part One: The Right Equipment

     Part one of the "National Audubon Society Guide To Digital Nature Photography," by Tim Fitzharris, describes the basic information needed in moving toward being a professional nature photographer. He has good examples and feedback that are very helpful in making me a better photographer. I learned some extremely beneficial information about what kind of equipment I should posses, why that equipment is important, tips in the field and where I should go to have good photo taking opportunities.
     The first chapter explains why the digital (SLR) cameras are beneficial in producing professional quality photos and also have many other benefits that are superior to other cameras.  Digital photos are easily managed and last essentially forever, assuming that you don't lose them. For nature photography, their speed and accuracy is essential in getting good shots of moving subjects. Fitzharris also describes a few good tips on what type of camera bodies to buy, giving examples of different specifications you may want depending on your intent. He also explains that, depending on your subject, you will need different lenses to get the best picture possible. For example, if you want to shoot close up shots of bugs, a macro lens would be the best lens to use.
     In the next two chapters, Fitzharris does a good job describe two other important types of equipment; tripods and super-telephoto lenses. In the section on tripods, he explains the significance and importance of using a tripod to produce quality photos, suggesting its almost as important as the camera itself. He gives tips on which types of heads to use, whether it be the gimbal type (which works well with the super-telephoto lens) or a basic type, such as the ball and socket head. He also explains that when purchasing a tripod you should keep in mind that the lighter the tripod the better and make sure it is tall enough and fits you and your needs.
     The chapter on super-telephoto lenses was a section that taught me a lot about the importance of focal length in nature photography. In nature, there can be dangers or rules about being too close to certain subjects. Super-telephoto lenses are desirable because you can take quality photos with out being too close. When buying super-telephoto lenses, make sure you get one that is weatherproof, with vibration reduction and an auto focus to manual switch, which are all helpful when trying to get quality shots.
     The next chapter focuses on important knowledge about working in the field. He emphasizes how important it is to have the right gear when working in the field so that you're able to be as efficient as possible. For example, a professional camera vest with quick release flaps and pockets are helpful in order to change your equipment quickly in order to capture shots. Having a vest would be very helpful for me because I struggle having to carry my extra lens and gear in my pockets. He stresses that we need to be prepared for any situation or photo opportunity that arises. A few things you may want to bring while in the field are duct tape, for a quick fix; reflectors, to change lighting; a plastic bag to cover your camera in case  of rain; and a cell phone. The following chapter was similar, but was focused  on working in the field in a cold, winter setting. It talks about everything a Montana boy knows about clothing and what to wear to keep warm. Layers! One useful thing I learned was to keep extra batteries and to keep them warm, since they diminish in the cold.
     The last chapter of this section describes where to go during specific times of the year for great photo opportunities. It talks about some very obvious places, like North America's National Parks and the Grand Canyon, but it gave a good explanation of why certain times of the year are better for lighting, color, and subject matter. The one that I wanted to go to was Maui, Hawaii in December because it sounded like a incredible place to visit to take photographs.